How to use HWID Changer
From first launch to changing and restoring your HWID
What you need
- Windows — from Windows 7 SP1 to Windows 11.
- Administrator rights — the app asks for them on launch. HWID cannot be changed without them.
- Internet — the app only works while it can reach our server.
- 3 free actions — are credited to every new computer: a change and a restore use one each. No sign-up and no activation keys.
Download and first launch
- 1Download HwidChanger.exe from the Download page. It is a single file, no installation needed.
- 2Run the file. Windows asks for permission to run it as administrator — click Yes.
- 3If Windows or your antivirus blocks the launch, open the Download page, section “If Windows blocks the launch”, and follow the steps there.
- 4Wait until “Connecting...” is replaced by your UID and the number of changes available. The app is ready.
Main window
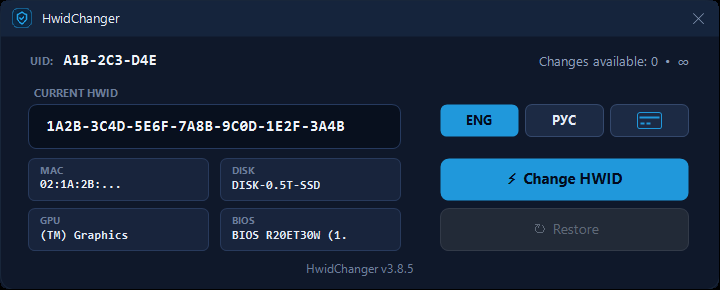
- UID — the permanent number of your computer in the XXX-XXX-XXX format. Click it to copy. You need the UID for payment and support requests; it does not change when the HWID changes.
- Changes available — how many changes you have left. With an active subscription it shows “Available: ∞” and the date the subscription runs until.
- CURRENT HWID — the current identifier of your computer. A new value appears here after a change.
- Change HWID — opens the component selection and starts the change.
- Restore — opens the list of saved states. The button is inactive before the first change and when there is no connection.
- MAC, DISK, GPU, BIOS — details of the computer's hardware.
- ENG / РУС — interface language. The payment button is next to it.
How to change your HWID
- 1Fully close the application you are changing the HWID for. Make sure it is not in the process list or in the system tray.
- 2Run HWID Changer as administrator.
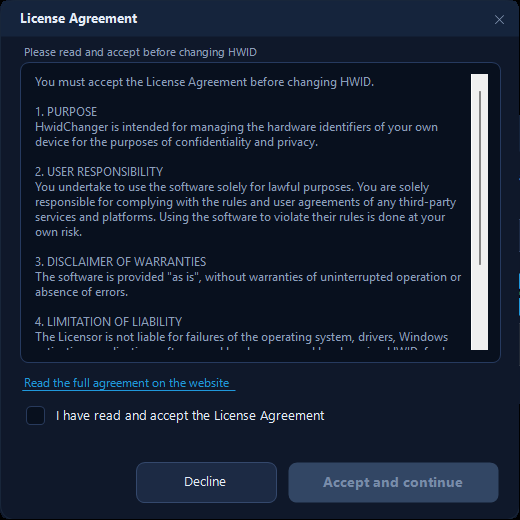
- 3Click “Change HWID”. On the first change the License Agreement opens: read it, tick the acceptance box and click “Accept and continue”.
- 4In the “What to change?” window keep the default selection and click “Change all”.
- 5Wait for the message “HWID changed, backup saved”.
- 6Restart the computer.
- 7To test, connect through mobile internet: turn on the hotspot on your phone and connect the computer to it.
- 8Start your application and sign in with a clean account.
Before every change the app saves the previous values. You can return to them with the “Restore” button.
Choosing components
In the “What to change?” window everything is ticked by default except “Disk ID (MBR/GPT)”. You do not need to change this selection.
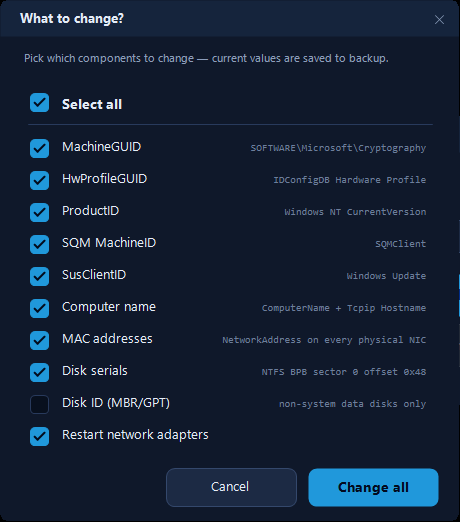
- MachineGUID, HwProfileGUID, ProductID, SQM MachineID, SusClientID — Windows identifiers.
- Computer name — the network name of the computer. The new name shows after a restart.
- MAC addresses — addresses of physical network adapters. Virtual adapters of VPNs and virtual machines are not touched.
- Disk serials — volume serial numbers. The new number of the system disk shows after a restart.
- Disk ID (MBR/GPT) — off by default. Affects non-system data disks only. The app verifies the result and puts the previous value back if the change is not confirmed.
- Restart network adapters — required for the new MAC addresses to take effect. Keep it on. The internet drops for a few seconds.
Not changed: BIOS serial number, motherboard UUID, the factory serial number of the drive and the CPU model. They are stored in the hardware itself.
Some network cards do not accept a new MAC address and keep using the factory one. You can check the address with the getmac /v command.
How to restore a previous HWID
- 1Click “Restore”.
- 2Pick a state from the list. ORIGIN is the initial state of the computer before the first change; the other rows are the states saved before each change, with date and time. The list shows 10 rows per page, with a date search field at the top.
- 3Click the row you need. The app puts the saved values back.
- 4Restart the computer.
A restore uses one change from your balance, the same as a regular change. The first 3 actions on a new computer are free. With an active subscription there is no limit.
Saved states are tied to the UID. They cannot be restored on another computer.
Changes and subscription
- Single change — $1.
- 30-day subscription — $10, unlimited changes.
- 365-day subscription — $50, unlimited changes.
- 1Click the payment button in the app — the payment page opens with your UID. Or open the Payment section of the site and enter the UID manually.
- 2Choose an option and pay by bank card or with Telegram Stars.
- 3Go back to the app. There are no keys to enter: the balance updates by itself.
A subscription is tied to the UID of one computer. Another computer has its own UID and its own balance.
Updating the app
- “v… available” next to the version number — a new version is out. Click the label — the app downloads and installs the update.
- “Update required for correct operation” — click “Update now”. HWID change is unavailable until you update.
- The site opened instead of updating — download the file from the Download page and run it instead of the old one.
If the app does not connect
Signs: “Connecting...” does not go away, the UID does not appear, or you see “No internet connection — check your network or VPN”. Try these in order:
- 1Share the internet from your phone and connect the computer to that network. Android: Settings → Connections → Mobile Hotspot. iPhone: Settings → Personal Hotspot.
- 2Turn on a VPN.
- 3Set your DNS to 1.1.1.1.
- 4Close the app and run it as administrator.
If that did not help, click “Diagnostics” next to the error message, save the report and send it to our Telegram support bot.
Good to know
- The change is permanent. A restart or Windows updates do not revert it. The previous values come back through a restore in the app, a Windows reinstall or a factory reset.
- Windows with a digital license and some paid software may ask for re-activation: to them the computer looks new. Activate again or restore the previous state.
- The app changes the identifiers of the computer. It does not affect a block placed on an account on the service side.
- An antivirus may warn about the app because it modifies the system registry. Allow the launch or add the file to exclusions.